edX-platform - Up and Running in Vagrant environment
After a while messing around with edX platform source code (http://iambusychangingtheworld.blogspot.com/2013/06/edx-source-code-exploration.html), I decided to run the platform using the recommended way, the Vagrant way.
I followed the instructions from the edx-platform repo: https://github.com/edx/edx-platform#installation---the-first-time. But, there're something I had to do to make it work:
0. My computer (CPU) has to support virtualization technology or the vagrant environment will not run or hang forever :D. So, CPU core i3, i5 +... is fine.
My system that run successfully the edX-platform is:
Host machine:
- Recommended core i5 CPU, Ubuntu 12.04 32bit.
- My laptop: AMD Turion x2, Ubuntu 13.04 64bit
1. Before doing anything, install NFS:
2. Install Virtualbox version 4.2.12 (+extension pack), and Vagrant version 1.2.2 or later
I tried install the newer version of Virtualbox (4.2.16) but It's a pain in the ass, so you shouldn't.
Update: Use this link to download Virtualbox 4.2.12 for Ubuntu 13.04 x64 + extension pack :
http://download.virtualbox.org/virtualbox/4.2.12/
+ VirtualBox: http://download.virtualbox.org/virtualbox/4.2.12/virtualbox-4.2_4.2.12-84980~Ubuntu~raring_amd64.deb
+ Extension pack: http://download.virtualbox.org/virtualbox/4.2.12/Oracle_VM_VirtualBox_Extension_Pack-4.2.12-84980.vbox-extpack
3. After cloned the edx-platform repo, open /edx-platform/requirements/edx/github.txt and change all the Third-party repos section from:
-e git://...
to
-e git+https://...
For example:
# Third-party:
-e git+https://github.com/edx/django-staticfiles.git@6d2504e5c8#egg=django-staticfiles
-e git+https://github.com/edx/django-pipeline.git#egg=django-pipeline
-e git+https://github.com/edx/django-wiki.git@ac906abe#egg=django-wiki
-e git+https://github.com/dementrock/pystache_custom.git@776973740bdaad83a3b029f96e415a7d1e8bec2f#egg=pystache_custom-dev
-e git+https://github.com/eventbrite/zendesk.git@d53fe0e81b623f084e91776bcf6369f8b7b63879#egg=zendesk
4. And now I can proceed to vagrant up step (from step #7):
#########################################################
Afterwards, it will download an image, install all the dependencies and configure the VM. It will take a while, go grab a coffee.
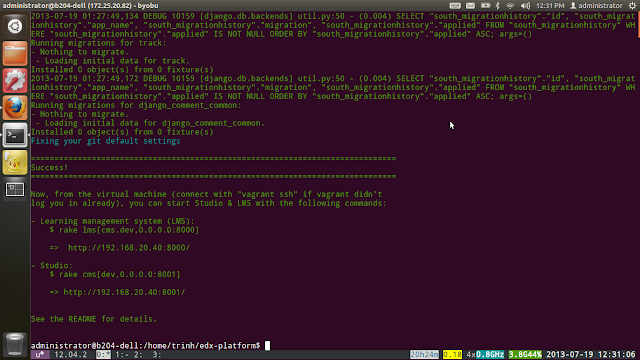
Once completed, hopefully you should see a "Success!" message indicating that the installation went fine. (If not, refer to the troubleshooting section.)
Note: by default, the VM will get the IP
#########################################################
And success!!!
Update July 21, 2013: Successful deploy on Ubuntu 13.04 x64
5. Run the LMS and CMS:
Learning management system (LMS):
Now I can access the LMS and CMS by opening the browser on my host machine and enter those following url:
http://192.168.20.40:8000/ for the LMS
and
http://192.168.20.40:8001/ for the CMS
What to say? I say AWESOMENESSSS!!!!
Update: today, I deployed the edX-platform successfully on another machine with the following information:
- AMD Turion x64
- Ubuntu 13.04 x64
- VirtualBox 4.2.12 x64
- Vagrant 1.2.4 x64
Notes:
During "vagrant up", make sure your Internet Connection is good or the process will fail.
I followed the instructions from the edx-platform repo: https://github.com/edx/edx-platform#installation---the-first-time. But, there're something I had to do to make it work:
0. My computer (CPU) has to support virtualization technology or the vagrant environment will not run or hang forever :D. So, CPU core i3, i5 +... is fine.
My system that run successfully the edX-platform is:
Host machine:
- Recommended core i5 CPU, Ubuntu 12.04 32bit.
- My laptop: AMD Turion x2, Ubuntu 13.04 64bit
1. Before doing anything, install NFS:
$ sudo apt-get install nfs-common nfs-kernel-server
2. Install Virtualbox version 4.2.12 (+extension pack), and Vagrant version 1.2.2 or later
I tried install the newer version of Virtualbox (4.2.16) but It's a pain in the ass, so you shouldn't.
Update: Use this link to download Virtualbox 4.2.12 for Ubuntu 13.04 x64 + extension pack :
http://download.virtualbox.org/virtualbox/4.2.12/
+ VirtualBox: http://download.virtualbox.org/virtualbox/4.2.12/virtualbox-4.2_4.2.12-84980~Ubuntu~raring_amd64.deb
+ Extension pack: http://download.virtualbox.org/virtualbox/4.2.12/Oracle_VM_VirtualBox_Extension_Pack-4.2.12-84980.vbox-extpack
3. After cloned the edx-platform repo, open /edx-platform/requirements/edx/github.txt and change all the Third-party repos section from:
-e git://...
to
-e git+https://...
For example:
# Third-party:
-e git+https://github.com/edx/django-staticfiles.git@6d2504e5c8#egg=django-staticfiles
-e git+https://github.com/edx/django-pipeline.git#egg=django-pipeline
-e git+https://github.com/edx/django-wiki.git@ac906abe#egg=django-wiki
-e git+https://github.com/dementrock/pystache_custom.git@776973740bdaad83a3b029f96e415a7d1e8bec2f#egg=pystache_custom-dev
-e git+https://github.com/eventbrite/zendesk.git@d53fe0e81b623f084e91776bcf6369f8b7b63879#egg=zendesk
4. And now I can proceed to vagrant up step (from step #7):
#########################################################
Installation - The first time
The following instructions will help you to download and setup a virtual machine with a minimal amount of steps, using Vagrant. It is recommended for a first installation, as it will save you from many of the common pitfalls of the installation process.- Make sure you have plenty of available disk space, >5GB
- Install Git: http://git-scm.com/downloads
- Install VirtualBox: https://www.virtualbox.org/wiki/Download_Old_Builds_4_2 (you need version 4.2.12, as later/earlier versions might not work well with Vagrant)
- Install Vagrant: http://www.vagrantup.com/ (Vagrant 1.2.2 or later)
- Open a terminal
- Download the project:
git clone https://github.com/edx/edx-platform.git - Enter the project directory:
cd edx-platform/ - (Windows only) Run the commands to deal with line endings and symlinks under Windows
- Start:
vagrant up
Afterwards, it will download an image, install all the dependencies and configure the VM. It will take a while, go grab a coffee.
Once completed, hopefully you should see a "Success!" message indicating that the installation went fine. (If not, refer to the troubleshooting section.)
Note: by default, the VM will get the IP
192.168.20.40. If you need to use a
different IP, you can edit the file Vagrantfile. If you have already started the
VM with vagrant up, see "Stopping and restarting the VM" below to take the change
into account.#########################################################
And success!!!
Update July 21, 2013: Successful deploy on Ubuntu 13.04 x64
5. Run the LMS and CMS:
Learning management system (LMS):
$ rake lms[cms.dev,0.0.0.0:8000] $ rake cms[dev,0.0.0.0:8001]Now I can access the LMS and CMS by opening the browser on my host machine and enter those following url:
http://192.168.20.40:8000/ for the LMS
and
http://192.168.20.40:8001/ for the CMS
What to say? I say AWESOMENESSSS!!!!
Update: today, I deployed the edX-platform successfully on another machine with the following information:
- AMD Turion x64
- Ubuntu 13.04 x64
- VirtualBox 4.2.12 x64
- Vagrant 1.2.4 x64
Notes:
During "vagrant up", make sure your Internet Connection is good or the process will fail.


Comments
Post a Comment