Posts

Showing posts from June, 2015

Get all users in moodle (2.x)

To get all users in moodle using the API(s), you can use the following snippet: #! /user/bin/php <?php define('CLI_SCRIPT', true); require_once('config.php'); // if you call DB inside a function, you'll need: // global $DB; $allusers = $DB->get_records('user'); foreach($allusers as $user) {      echo "User id $user->id is $user->username\n"; } ?>

The power of open in education

Image
Amazing:

Purge Varnish cache

A handy command to purge Varnish cache for a specific host: varnishadm "ban req.http.host == my.host.com"

The best way (until now) to change domain name of a WordPress Multisite

Important Note: If you change the "DOMAIN_CURRENT_SITE" option in your wp-config.php of your multisite, you will not be able to connect to the database (via web and wp-cli) You should use this tool to change the domain name of your multisite: Github repository:  https://github.com/interconnectit/Search-Replace-DB 1. Clone the git repo into your WordPress root: $ git clone https://github.com/interconnectit/Search-Replace-DB 2. Open the browser, go to http://old.multisite.com/Search-Replace-DB/ and start searching and replacing: First search and replace your old url to the new one on all the tables (you can click " dry run " to check first, click " live run " to actually make changes): Old URL: http://old.multisite.com New URL: http://new.multisite.com Then, search and replace old domain to the new one one on all the main wordpress table (wp_sites, wp_blogs,...): Old domain: old.multisite.com New domain: new.multisite.com Af

How to check if a folder is empty in bash shell

Just use this following script: if find /some/dir/ -maxdepth 0 -empty | read v;  then         echo "Empty dir" fi Or to check not empty: if ! find /some/dir/ -maxdepth 0 -empty | read v; ...

Parsing csv files in shell script

There are many ways to parse csv file in shell script. Here is the one that works well for me: Assuming I have this csv file, mycsv.csv: super,genius cool,awesome ... This script, parse_csv.sh , will parse mycsv.csv: $ nano parse_csv.sh #! /bin/bash IFS=',' while read f1 f2 do         # remove the carriage return character at the end of each line (path column)        newvar= $(echo $f2 | sed -e 's/\r//g')        echo "First column: $f1"        echo "Second column: $newvar" done < $1 $ sudo chmod +x parse_csv.sh $ ./parse_csv.sh mycsv.csv

Passing password to the rsync command with sshpass

In some cases, when writing a bash shell script like running the rsync command multiple times, and you want to avoid entering username and password over and over again, you may find sshpass useful. $ sudo apt-get install sshpass Example script: #! /bin/bash for oldblogid in `cat $1` do         media=/var/www/wp-content/blogs.dir/$oldblogid           echo "=== Checking the existance of $media directory..."                                                                                                if [ -d "$media" ]          then                 echo "    Existed! Copying $media..."                                                                                                                   sshpass -p 'your-ssh-password-for-myuser' rsync -arv $media -e ssh myuser@new.multisite.com:/home/myuser/sites/                        fi done

Wordpress multisite migration with wp-cli

There are many way to migrate a multisite WordPress to a new one including: database import... In my case: I created new blogs for all the users first (in the new multisite, the blog_ids will be different than in the old multisite). Export data of all blogs (wordpress-importer) from the old multisite. (wp-cli) Import data (only posts, comments) exported from the old blogs. (wp-cli) Finally, copy over the media, rename the directory names with the new blog_id. Search and replace all the media links in the database (wp-cli) Here are the details steps: 1. Export data of all the blogs from the old WordPress multisite and transfer to the new one: We need to use my modification of wp-cli ( click here ) to set name of the backup data the blog's path: blog1path.xml, blog2path.xml... This way we will know which file belongs to which blog and user in the new multisite. Assuming: My custom wp-cli source is at /home/myuser/wp-cli/ Wordpress multisite root: /var/www/ Backu

How to set name of the wxr file when exporting blog data using wp-cli

By default (actually, you cannot change right now), when you export blog data usingWP-CLI, the wxr will be name as following: myblogname.wordpress.2015.xml 1. Clone the wp-cli project: $ git clone https://github.com/wp-cli/wp-cli.git 2. Install composer and install WP-CLI's dependencies: $ curl -sS https://getcomposer.org/installer | php $ sudo mv composer.phar /usr/local/bin/composer $ cd /path/to/wp-cli/src/ $ composer install 3. Modify the get_filename_template function in /path-to-wp-cli-src/php/commands/export.php. For example, I want to name the exporting file after the blog's path: blog-1-path.xml $ nano /path/to/wp-cli/src/php/commands/export.php ... private static function get_filename_template() { $export_file_name = get_bloginfo('url') . ".xml"; $export_file_name = str_replace("http://", "", $export_file_name); $export_file_name = str_replace("/", "", $export_file_name); if( i

How to see your motherboard info from Windows 7

In Windows 7, you can find out your computer's motherboard information by running this command in cmd: wmic baseboard get product,Manufacturer,version,serialnumber Quite easy huh?

My first 3D printed model

Image
Oh right, this is my first 3D printed model ever: These are things that good and not good about this Micro 3D printer at this moment: Good: The printer is small, has elegant design It's not only easy to get up and running, but also so intuitive to operate Quiet when printing The software is quite easy and simple. The printed object is pretty accurate in size and shape (except for the distorted head of the little minion) Not good: The M3D software does not support Linux yet which made me to go all over my friend house and borrowed his windows computer. For some reasons, the printed model is distorted at the top even though I only printed it at the medium level (It took more than 3 hours). Seem like the complex models like the one I printed here is hard for M3D. The result is not so good as I expected. Conclusion: I guess I need to polish the printed model to remove the protection material surround the object. I will need to upg

Quote of the day

"Real was there before Facebook." ~"While we're young"

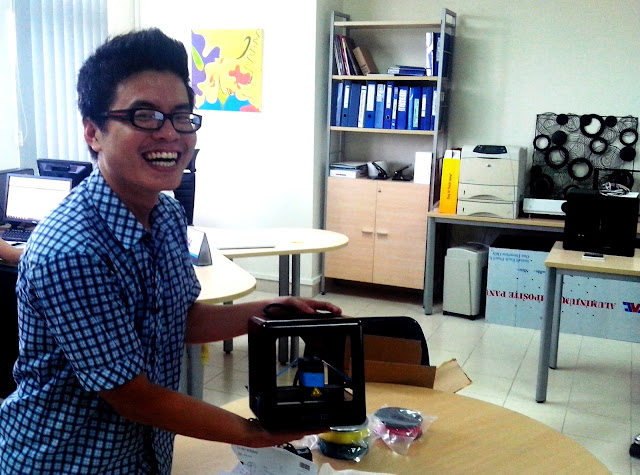
The Micro 3D printer is coming to town

Image
Oh right, finally the 3D printer I pre-ordered months ago had been delivered to my office this afternoon. It's time to change the world!!!! \m/ \m/ \m/ M3D printer's official website: https://printm3d.com/themicro/

Cleaning up your WordPress Multisite instance with wp-cli

At some points in life, your WordPress Multisite will become too big and needs to be cleaned up, things like spam comments, revisions, transients... And of-course, you don't want to go blog by blog to clean up all those things. It may take days or weeks if you have > 1000 sites like mine. Here is your savior: WP-CLI WP-CLI is a command line tool which can help you manage your WordPress site flawlessly (:D). This blog post will show you how to use wp-cli to clean up your WordPress Multisite including: 1. Transients: Create a shell script inside your WordPress dir root: $ cd /path/to/wordpress/root $ sudo nano clean_transients.sh #!/bin/bash for url in $(wp site list --field=url --allow-root) do   echo $url #used for progress purposes   wp transient delete-all --url=$url --allow-root done $ sudo chmod +x clean_transients.sh $ sudo ./clean_transients.sh --allow-root 2. Spam comments: $ cd /path/to/wordpress/root $ sudo nano clean_comments.sh #!/b

Natalie Portman Harvard Commencement Speech

Image

Becoming Steve Jobs

Image
The first time I heard of this book I was like "Oh my, another Steve's book?". But, I gave it a try and found out a lot of interesting things about Steve Jobs's life. He's not a saint, not a pure genius, but a continuous autopilot, a reckless individual grown into a extraordinary leader that would led his company to great success and changed the world. I don't want to tell more about "Becoming Steve Jobs". You have to read this book and learn! Here are some photos from the book:

Moodle with SSL behind Varnish

Ok, after a whole morning working on my moodle server, I finally made it work with SSL while standing behind a Varnish cache server. Things are just as simple as the following steps: A. Moodle Server Configuration: 1. Moodle's config.php: tell moodle to acknowledge the ssl proxy (the varnish) and provide users access via SSL link ... $CFG->wwwroot   = 'https://mymoodle.com'; $CFG->sslproxy  = true; ... 2. Nginx's configuration: one important thing here is that we still have to config the nginx to serve moodle at port 80 (without ssl) despite the moodle's configuration server {         listen 80;         root /var/www/moodle;         index index.php index.html index.htm;         server_name mymoodle.com;         access_log   /var/log/nginx/moodle-access.log;         error_log    /var/log/nginx/moodle-error.log;         location / {                 try_files $uri $uri/ =404;         }         location ~ [^/]\.php(/|$) {              

Create a SFTP access only user to transfer files from and to a WordPress installation

So I heard that you want to enable FTP access (read + write) to a specific folder inside your WordPress (or any folder) directory to a specific user without installing the FTP service . SFTP is one way to achieve that. Follow these steps: Assuming: myuser: the user you want to grant access. /var/www/myvhost: is a WordPress installation directory. /var/www/myvhost/the_shared_folder (or the wp-content folder) : is a folder inside your WordPress root you want to grant access to myuser. 1. Create the user and specify the shared folder as her home directory: $ sudo useradd -d /var/www/myvhost/the_shared_folder myuser $ sudo passwd myuser 2. Disable shell login on myuser : $ sudo usermod -s /bin/false myuser 3. Configure ssh: $ sudo nano /etc/ssh/sshd_config ... #Subsystem sftp /usr/lib/openssh/sftp-server Subsystem sftp internal-sftp ... Match User myuser         X11Forwarding no         ChrootDirectory /var/www/myvhost/the_shared_folder         Allow

Change background image randomly from a directory using Ajax in WordPress

A couple weeks ago, I'm working on a project that required me to develop a WordPress theme. One of the things that interested me was to create a block (html, in the front page) that change its background image randomly every time I reload the page. Here is how I did that: The main idea here is using Ajax to dynamically change background of a div tag to a random image loaded from a folder inside the theme's root every time I reload the home page. 1. functions.php add_action('init', 'enqueue_scripts_styles_init'); function enqueue_scripts_styles_init () { wp_enqueue_script( 'ajax-script', get_template_directory_uri().' /js/myscript.js ', array('jquery')); wp_localize_script( 'ajax-script', 'ajax_object', array( 'ajaxurl' => admin_url( 'admin-ajax.php' ) ) ); } add_action('wp_ajax_get_rand_img', 'get_rand_img'); add_action('wp_ajax_nopriv_get_rand_img', 'get_rand_

Quote of the day

"You have no idea how powerful the truth can be!" ~The Arrow, Season 3, Ep 18, 38:15.

A photo

Image